
Knowing whether a guinea fowl egg is fertile before you set it in the incubator saves time, energy, and money. No one wants to run a full 28-day incubation cycle only to find empty shells at the end.
This guide covers 7 practical, easy-to-follow tips to help you identify fertile guinea fowl eggs — whether you are a first-time keeper or have run a flock for years. By the end, you will know exactly what to look for before, during, and after incubation.
What Makes a Guinea Fowl Egg Fertile in the First Place
A fertile guinea fowl egg contains a fertilised blastodisc — the small cluster of cells that will develop into a keet (baby guinea fowl). Fertilisation happens when a male guinea fowl (called a cock or helmeted guinea cock) mates with a female within roughly 5–7 days before the egg is laid.
An infertile egg, by contrast, contains only an unfertilised ovum. It looks identical on the outside but will never develop into a chick under incubation.
Key conditions that affect fertility:
- Male-to-female ratio: A healthy ratio is 1 male per 4–6 females. Too few males means many eggs go unfertilised.
- Breeding age: Guinea fowl typically reach sexual maturity at around 6–8 months. Young or very old birds produce fewer fertile eggs.
- Season: Guinea fowl are seasonal breeders. Peak fertility usually falls between spring and early summer in the Northern Hemisphere, roughly March through August.
- Nutrition: Hens need adequate protein (16–20%) and calcium for healthy, fertilisable eggs. The University of Kentucky Cooperative Extension recommends a complete layer or breeder ration for breeding flocks.
Tip 1: Check for a Male Bird in the Flock (The Most Basic Requirement)
The simplest starting point — confirm a mature male guinea fowl has access to your hens. Without a male present, no egg will ever be fertile.
A male guinea fowl is identified by his rounded, larger wattle and a distinctive one-syllable call, compared to the female’s two-syllable “buck-wheat” sound. If your flock is all-female or the male was recently introduced (less than a week before the eggs were collected), assume the eggs are infertile until proven otherwise.
Tip 2: Inspect the Germinal Disc on a Fresh Cracked Egg
This method only works on eggs you are willing to sacrifice, but it gives a definitive answer.
Crack a fresh egg onto a flat white plate and look at the yolk. On the surface of the yolk, find a small white circular spot called the germinal disc (or blastodisc).
| Observation | What It Means |
|---|---|
| Small, faint white dot, irregular edges | Infertile (blastodisc) |
| Clear white ring — like a bullseye — with a bright centre | Fertile (blastoderm — cell division has begun) |
The fertile bullseye pattern appears because cells have already started dividing. This is a reliable, zero-equipment method described in Penn State Extension’s poultry guides.
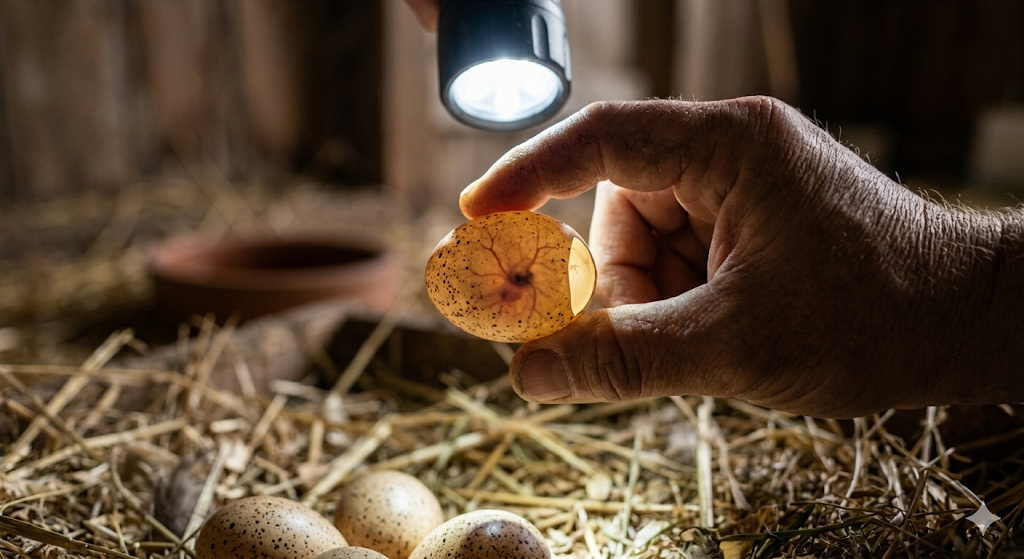
Tip 3: Use Candling to See Inside the Egg
Candling is the most widely used method to identify fertile guinea fowl eggs without cracking them open. It works by shining a bright, focused light through the shell to reveal the contents.
How to candle a guinea fowl egg:
- Darken the room completely — this is essential for clear visibility.
- Use a purpose-built candler or a small torch with a narrow beam.
- Hold the large end of the egg against the light source.
- Rotate the egg slowly and observe what you see inside.
What fertile eggs show during candling (by incubation day):
| Incubation Day | Signs of a Fertile Egg |
|---|---|
| Day 0 (fresh) | Faint shadow of the air cell; yolk visible but no other detail |
| Day 5–7 | A small dark spot with spiderweb-like red blood vessel branches |
| Day 10–14 | Dense dark mass filling most of the egg; large air cell at base |
| Day 20–25 | Dark interior with only the air cell visible; movement may be seen |
An infertile egg shows a clear, fully transparent yolk with no red vessels. A dead embryo (early quitter) shows a blood ring — a thin red circle just inside the shell — and no further development.
Guinea fowl shells are darker and thicker than chicken shells, which makes candling harder. A high-powered LED candler of at least 1,000 lumens is recommended for accurate results. The University of Georgia Extension Poultry Science team notes that dark-shelled eggs require stronger light sources for reliable candling.
Tip 4: Try the Float Test (With Important Caveats)
The float test uses water to gauge development inside an incubating egg. It should only be used after Day 7 of incubation — never on fresh eggs — because the air cell in a fresh egg has not had time to change in ways that reflect embryo development.
How to perform the float test:
- Fill a bowl with warm water (37–38°C / 99–100°F) — matching incubation temperature prevents thermal shock to the embryo.
- Gently lower the egg into the water.
- Observe its behaviour.
What the float test reveals:
| Egg Behaviour | Interpretation |
|---|---|
| Sinks, lies flat on the bottom | Fresh or infertile — small air cell |
| Sinks but tilts at an angle | Developing embryo — normal after Day 7 |
| Floats at the surface, stays still | Late-stage development OR rotten egg |
| Floats AND wobbles or moves | Living late-stage embryo (Day 21–27) |
A wobbling floating egg near the end of incubation is usually a good sign. A still, floating egg may indicate a dead embryo or spoiled egg. Do not rely on the float test alone — always candle first for confirmation.
Tip 5: Look for Movement During Late-Stage Candling
Between Day 20 and Day 26, a living guinea fowl embryo becomes large enough to move inside the egg. This movement is visible during candling and is one of the most reassuring signs of a healthy, fertile egg close to hatching.
Hold the egg against the light and watch for a slight rocking or rolling motion inside. The chick’s head may push against the air cell — this is called internal pipping and happens 24–48 hours before external pipping.
Stillness alone does not mean the egg is dead. Late-stage embryos rest for long periods. Check the same egg across two candling sessions, 12 hours apart, before concluding there is no movement.
Tip 6: Monitor the Air Cell Size and Shape
The air cell is the small pocket of air at the blunt end of every egg. In a fertile, developing egg, the air cell grows steadily as moisture evaporates through the shell during incubation. Tracking air cell growth confirms both fertility and healthy development.
Normal air cell progression in guinea fowl eggs:
- Day 0: Very small — roughly 3–5mm deep.
- Day 7: Deeper and clearly defined — roughly 10mm.
- Day 14: Takes up approximately one-quarter of the egg’s length.
- Day 21+: Takes up roughly one-third or more.
An air cell that is too large suggests excessive moisture loss (humidity too low). An air cell that is too small after Day 14 suggests excess humidity. Both affect hatch success regardless of fertility. Maintaining humidity between 55–65% during incubation and raising it to 70–75% in the final three days is standard practice for guinea fowl.
Tip 7: Record Incubation Results to Identify Fertility Patterns
Tracking hatch outcomes across multiple batches is the most powerful long-term method for understanding the fertility of your flock. A single infertile egg tells you little. A pattern of 40% infertile eggs tells you something is wrong with your male ratio, nutrition, or breeding conditions.
What to record for each batch:
- Collection date and total number of eggs set.
- Candle results at Days 7, 14, and 21 — number fertile, infertile, and dead-in-shell.
- Hatch rate — total keets hatched versus eggs set.
- Male-to-female ratio in the flock at the time.
A healthy, well-managed guinea fowl flock should produce fertility rates of 70–85% or higher. Consistently lower rates indicate a management issue worth investigating. The Poultry Extension at Mississippi State University recommends reviewing male health, flock density, and diet when fertility drops below 60% for two consecutive batches.
Frequently Asked Questions About Fertile Guinea Fowl Eggs
Fertility can feel like a guessing game at first. These are the most common questions guinea fowl keepers ask when they are just starting out.
How early can I tell if a guinea fowl egg is fertile? The earliest reliable method is the germinal disc inspection on a cracked fresh egg, which shows fertility immediately. By Day 5–7 of incubation, candling will reveal blood vessels in a fertile egg.
Can a guinea fowl egg look fertile but fail to hatch? Yes. An egg can start developing (showing blood vessels and a growing embryo) but die at any point during incubation. This is called dead-in-shell and is caused by temperature fluctuations, bacterial infection, humidity problems, or genetic issues — not infertility itself.
Does shell colour tell you if a guinea fowl egg is fertile? No. Guinea fowl eggs range from cream to tan to dark brown with speckles, but shell colour has no link to fertility. Colour is a breed and individual hen trait.
How long can I store guinea fowl eggs before setting them? Fertile guinea fowl eggs should be stored for no more than 7–10 days before incubation. Store them point-down (or at a slight angle), at 12–15°C (55–60°F), with 70–75% relative humidity. Fertility and hatch rates decline noticeably after 10 days of storage.
How do I know if a floating egg contains a live embryo or a rotten egg? A floating egg that wobbles or moves when nudged in warm water (Day 20+) is very likely a live late-stage embryo. A still floating egg with no movement may be infertile, dead, or rotten. Candle first — a rotten egg has a cloudy, murky interior. If in doubt, carefully crack it away from other eggs to check the smell and contents.
Knowing How to Identify Fertile Guinea Fowl Eggs Saves Every Hatch
Checking for fertility before and during incubation is one of the most practical skills a guinea fowl keeper can develop. The seven methods in this guide — from the germinal disc check to candling, float testing, air cell monitoring, and hatch tracking — give a complete picture of what is happening inside the egg at every stage.
Start with the germinal disc check on a sacrificed egg to confirm your flock is producing fertile eggs. Then use candling from Day 5 onward as your primary tool throughout incubation. Use the float test and air cell monitoring to catch problems early.
If your fertility rates are lower than expected, review your male-to-female ratio, feed quality, and flock health. A small adjustment often makes a big difference by the next hatch cycle.