
Candling guinea fowl eggs is one of the most useful skills you can develop as a guinea keeper. It lets you check whether your eggs are developing properly — without cracking them open.
This guide covers exactly when to candle, what to look for at each stage, and how to handle the tricky parts. By the end, you’ll feel confident doing it yourself.
What Is Guinea Fowl Egg Candling?
Guinea fowl egg candling is the process of shining a bright light through an egg to see what’s happening inside during incubation. The light passes through the shell and illuminates the contents, letting you spot blood vessels, embryo movement, air cell size, and signs of a non-viable egg.
The term “candling” comes from the old practice of using a candle as the light source. Today, most keepers use a bright LED torch or a purpose-built egg candler — both work well.
Guinea fowl eggs have thicker, darker shells than chicken eggs, which makes candling slightly harder. You’ll need a brighter light source and a dark room for clear results.
When to Candle Guinea Fowl Eggs
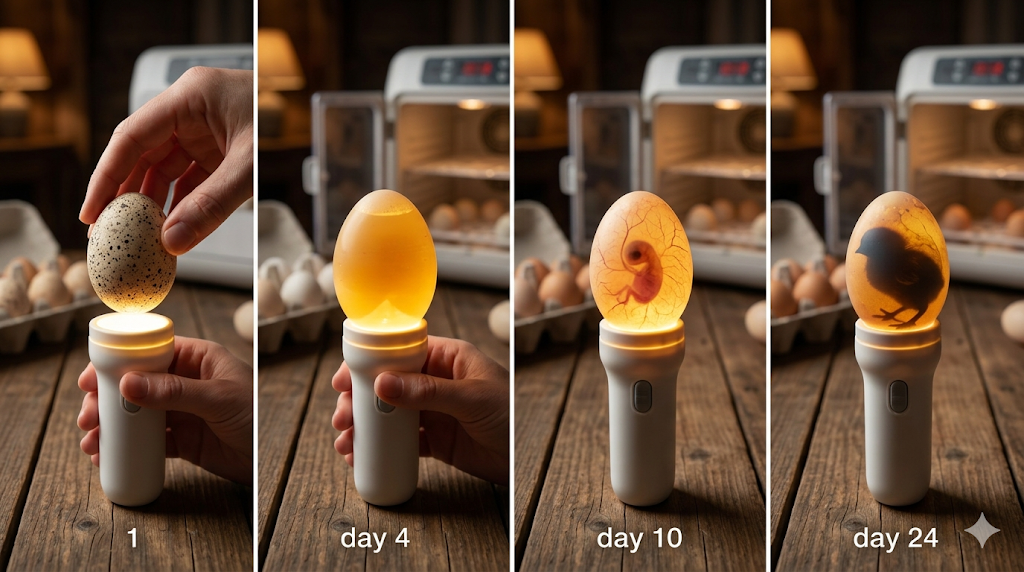
The best times to candle guinea fowl eggs are at Day 7, Day 14, and Day 24–25 of incubation. Guinea fowl eggs hatch at around Day 26–28, so these checkpoints give you a clear picture of development at each key stage.
Here’s a simple breakdown:
| Candling Day | What to Check |
|---|---|
| Day 7 | Early blood vessel development, fertility |
| Day 14 | Clear embryo growth, air cell size |
| Day 24–25 | Drawdown into air cell, pre-hatch position |
Avoid candling before Day 7. The embryo is too small to see clearly, and unnecessary handling increases the risk of temperature loss or accidental damage.
I’ve found that sticking to these three checkpoints — rather than candling every few days — gives more useful results and reduces stress on the developing eggs.
What You Need to Candle Guinea Fowl Eggs
You don’t need expensive equipment to candle guinea eggs. A few simple items are enough.
What to use:
- Bright LED torch or egg candler — at least 1,000 lumens for guinea fowl shells; a purpose-built candler like the Brinsea Ovascope works very well
- Dark room — complete darkness gives the clearest view
- Clean, dry hands — to avoid contaminating the shell
- Pencil — to mark infertile or questionable eggs before removing them
Avoid using incandescent bulbs. They generate heat that can damage the embryo during the candling process.
How to Candle Guinea Fowl Eggs Step by Step
Candling guinea fowl eggs takes less than two minutes per egg when done correctly. Work quickly to keep the eggs at a stable temperature.
- Prepare your space. Turn off all lights and close curtains to create a fully dark room.
- Wash and dry your hands. Oils from your skin can clog the shell pores and interfere with gas exchange.
- Remove one egg from the incubator. Handle it gently and place it in your non-dominant hand.
- Position the candler at the large end of the egg. The air cell sits here and gives the clearest initial view.
- Hold the egg at a slight angle. Tilt it gently back and forth to help the embryo shift into view.
- Observe for 15–20 seconds. Note the air cell size, blood vessel network, and any movement.
- Mark and return the egg. Use a pencil to mark questionable eggs with a “?” before returning them to the incubator.
- Repeat for each egg. Never leave eggs out for more than a few minutes total.
What to Look for When Candling Guinea Fowl Eggs
Knowing what a healthy egg looks like at each stage makes all the difference. Here’s what you should expect to see.
Day 7: Early Development
- Spider-like red veins spreading from a small dark spot — this is the embryo
- A clear, pinkish glow around the veins
- A defined air cell at the large end, usually 5–7mm deep
An egg that looks completely clear at Day 7 is likely infertile. An egg with a dark ring (called a “blood ring”) indicates early embryo death.

Day 14: Mid-Incubation
- Larger, darker veins filling more of the egg
- A visible dark mass (the embryo) that may move when the egg is tilted
- Air cell has grown noticeably larger
At this stage, a developing egg should look mostly dark when held to the light. If it still looks completely clear, it is not viable.
Day 24–25: Pre-Hatch
- The air cell takes up roughly one-third of the egg
- A dark, moving shadow filling the rest of the egg — this is the fully formed keet
- Drawdown visible — the embryo drops into the air cell in preparation for internal pipping
Do not turn eggs after Day 24. From this point, the keet needs to position itself correctly for hatching.
How to Identify Infertile and Dead Guinea Fowl Eggs
Identifying and removing non-viable eggs early prevents them from exploding inside the incubator, which can contaminate other eggs with bacteria.
Signs of an infertile egg:
- Completely clear at Day 7 — no veins, no dark spot, just a uniform pale glow
- Yolk shadow may be visible moving around loosely
Signs of early embryo death (blood ring):

- A red or dark ring visible just inside the shell at Day 7–10
- No live veins branching outward
Signs of late embryo death:
- Dark, unmoving mass with no blood vessels
- Foul smell when egg is held near your nose (do this carefully)
- Air cell may appear irregular or collapsed
I usually wait until Day 10 before removing any eggs I’m unsure about. If there’s still no development by then, I’m confident removing them.
Important: If you’re new to candling, when in doubt, leave the egg in. Mistakenly discarding a viable egg is worse than incubating a non-viable one a few extra days.
Guinea Fowl vs. Chicken Egg Candling: Key Differences
Guinea fowl eggs are harder to candle than chicken eggs for a few reasons. Understanding these differences helps you get clearer results.
| Feature | Guinea Fowl Eggs | Chicken Eggs |
|---|---|---|
| Shell color | Speckled tan/brown | White or light brown |
| Shell thickness | Thicker, harder | Thinner |
| Light penetration | More difficult | Easier |
| Incubation length | 26–28 days | 21 days |
| Candling checkpoint | Day 7, 14, 24–25 | Day 7, 14, 18 |
Because guinea shells are thicker and darker, you may need to press the candler directly against the shell surface and use the brightest light available. A dim candler that works fine for chicken eggs will often be too weak for guinea fowl.
Tips for Better Candling Results with Guinea Fowl Eggs
A few small adjustments make a big difference when candling guinea fowl eggs.
- Use the brightest candler you can find. A 1,000+ lumen LED flashlight or a purpose-built candler gives the clearest view through thick shells.
- Candle in complete darkness. Even small amounts of ambient light wash out the image inside the egg.
- Candle quickly. Keep each egg out of the incubator for less than 30 seconds to prevent temperature drop.
- Tilt the egg gently. A slow tilt helps you spot embryo movement and see around the yolk shadow.
- Keep a candling record. Note what you see at each checkpoint so you can track development accurately.
Humidity and temperature inside the incubator directly affect air cell size. According to Mississippi State University Extension, proper incubation humidity for guinea fowl eggs is typically 55–60% for the first 25 days, dropping to 65–70% during lockdown (Day 25 onward). A growing air cell is one of the best signs your humidity is calibrated correctly.
FAQs About Guinea Fowl Egg Candling
Candling guinea fowl eggs raises a lot of questions, especially for first-time incubators. Here are answers to the most common ones.
Can I candle guinea fowl eggs with a phone flashlight? It depends. Some phone flashlights are bright enough for early-stage candling, but they often lack the focused beam needed to see through guinea fowl shells clearly. A dedicated LED egg candler or a powerful torch with a narrow beam works much better.
What if I can’t see anything through the shell? This usually means you need more light or a darker room. Try pressing the candler directly against the shell rather than holding it slightly away. If you still can’t see anything by Day 14, the egg is likely infertile or non-viable.
Is it safe to candle guinea eggs every day? No — and it’s not necessary either. Daily candling increases handling stress and temperature fluctuation without providing useful additional information. Stick to the recommended checkpoints at Day 7, 14, and 24–25.
What does a “weeping” egg look like when candled? A weeping or sweating egg — one that has started to rot — may appear darker than expected, smell foul, and have an irregular or collapsed air cell. Remove it immediately and away from the incubator to avoid contamination.

When should I stop turning guinea fowl eggs? Stop turning at Day 24–25, when you move eggs into lockdown. At this point, the keet needs to align itself with the air cell to begin internal pipping.
My egg shows movement at Day 14. Is that a good sign? Yes — visible embryo movement at Day 14 is a strong sign of a healthy, developing keet. Some embryos are more active than others, so don’t worry if movement is subtle. As long as you can see veins and a dark mass, development is on track.
Final Thoughts on Guinea Fowl Egg Candling
Candling guinea fowl eggs gives you a real window into the incubation process. At Day 7, you’ll know which eggs are fertile. At Day 14, you can track healthy growth. At Day 24–25, you’ll see your keets getting ready to hatch.
The biggest mistake new keepers make is either candling too often or discarding eggs they’re unsure about. Take your time, use a bright light, and when in doubt — leave it in.

If you’re setting up your first incubation, check your candler setup early. Knowing your equipment works before the eggs go in saves a lot of frustration later.
Have a question about what you’re seeing when you candle? Drop it in the comments — I’m happy to help you figure it out.